See a post from earlier today for a quick tour of this and most of the other scenes/rooms.
Friday, November 1, 2013
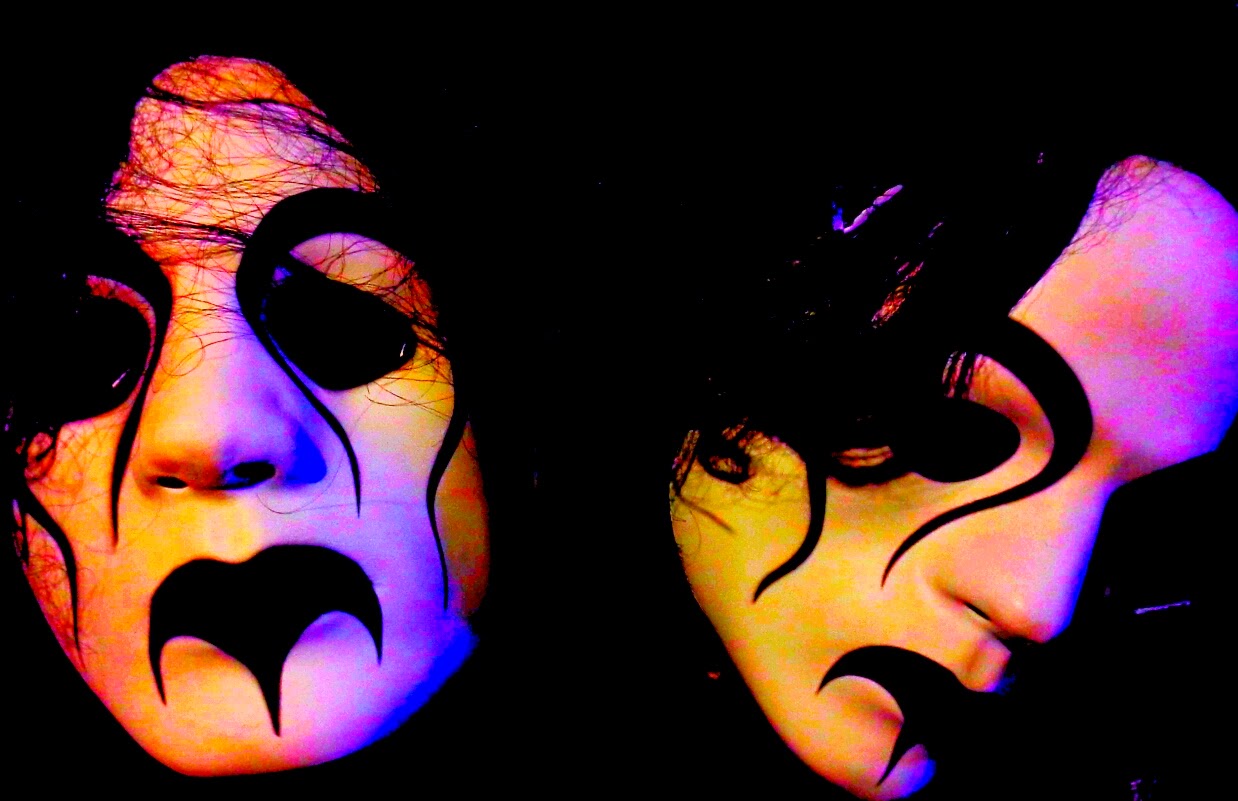
Some pics from inside the last section: the Spider Room...the Murder Clown Room.
Spider video, with leaping spider prop nearby...

... and then you turn the corner


And the lesson all haunters learn AFTER they tear everything down is to make sure to photo everything twice. Unfortunately, I forgot to photo half of it once to share here.
The Morning After
Here are some day-after pics of the walkthrough to better show the detail. Everything looked more foreboding and less fake at night, but that didn't't photo well. These pics are more for other haunters to share ideas. These three are of the middle part, the "Dead Do Not Rest" mini graveyard. The curtain area is the ghost projection screen and also acts as a hidden doorway into the workshed and garage behind it. Although the curtain is yellow, it blended with the grey at night time and reflected the ghost images well. Many hesitated walking through it into the rest of the haunt, not knowing that there was still a building left to go though.


VIDEO WALKTHROUGH TIME !!!!!
Halloween has passed, I have wasted the day recovering, and we have more candy left over than any couple should. The problem with our usual 1,000+ TOTs (trick-or-treaters) turnout was that the city is taking forever to install a roundabout nearby and had closed the streets to thru traffic. Some ignored that, but not enough. I think we may have had 300+. That number is impressive for most haunters, but we had bought candy and small toys/junk for 1,200. So our waistlines and dental health will take a beating this winter. The walkthrough haunt was a success. No injuries, no complaints, many thrilled people, and around 120 went through. I didn't count. My actors no-showed for the first hour or so, making it a stressful beginning. And my usually dependable landscape lighting failed in parts. And there was wind bashing tarps about. But still... a success. Many haunt fans were created, and I suspect they will tell others and return next year. Only one failure dad... being an idiot who liked to terrorize his young kid throughout the haunt, likely creating a kid who never wants to go through one again. And the dad thought it was funny. Again, only one out of 120 people, so it was expected. On another positive, my elderly neighbor went through, loved it, came back a second time with his equally elderly wife who had to take a break midway through (was worried I was about to have my first ambulance call), but still finished up through the rougher parts and also loved it.
BAD NEWS: I TOOK NO VIDEO OF THE HAUNT DURING HALLOWEEN. And for that I must apologize. :( But I was practically solo and had know opportunity to play cameraman while herding people through. Do not underestimate the ability for people to get lost in your backyard at night.
GOOD NEWS: I did take Nov 1 walkthrough vids, posted below. My phone doesn't do well in very low light, so I had to opt for afternoon shade to be able to show any detail. Pardon the shaky-cam.
Part 1: the sideyard entrance going through a small staging area, the witch's room, the ghoul alley with alter and gore (that no one really noticed!), and ending at the backyard graveyard. Again, everything looked much better in the moonlight.


Part 2: the backyard graveyard has its main feature as a ghost projection (not seen in this vid) that acted as a hidden doorway into the detached garage. The tree canopy and surrounding vines and bushes did much to disorient guests. And as I commented in the video, quite a few became confused and stared right into the projector rather than notice the large, cool ghost being projected on the screen. So I had to be nearby to help verbally guide them through the curtain. The bonus for that situation is that those guests were somewhat blinded going into the workshed portion; a strobe room.

Where is the strobe room vid? Well... it didn't make the cut for these videos. I may attempt one later, but I was unimpressed with the way it looked onscreen. It was, however, a big hit for the guests. I used the AtmosFEARfx Critters 2 DVD, looping roaches, spiders, rats, and snakes... all on a 42" LCD, with fog, webs, and fake critters all around, and one of those large lunging spider animatronics being activated by a step pad by them.
Moving On! This final segment is my descent into madness... evil clowns... dj lights... hanging flesh on hooks... and TVs loudly playing messed up videos. Simple blue tarps were used as walls to allow for a more fluid setup. The video ends going into the last room, where 2 more dummy props were standing and a table was set up for an actor to be attacked by another actor. It was the chainsaw end, so to speak. No chainsaw, but guests lost their minds and ran out of the garage down the 80 feet of service alley back to the front yard.
I will try to take some video of the ghost curtain and strobe room later tonight to do them better justice. They were definite highlights of the haunt and will be used again in next year's setup.
I also have taken some photos that I will post for those that don't want to get motionsick from watching the videos above.
Tuesday, October 22, 2013

The front graveyard has been deployed! I am not sure if I will try to put in a few more or go with what I have. Most are oriented towards the house. A few are toward the street (that should be closed to traffic on haunt nights). And the few that are more horror related will be sequestered to the walkthrough haunt area.


----------------
One gravestone doesn't really fit with the others and may be the only of its kind in home haunts. I got the idea from a Canadian goth cartoon from a few years ago that is more entertaining than it should be to me and my wife. But it is often weird Canadian humor, and that works well with Halloween. I present... the Ruby Gloom inspired stone. Doom Kitty and Scaredy Bat. Don't judge me.

Thursday, October 17, 2013


Wednesday, October 16, 2013

The dead tree thing won't be done this year. But it did serve as a great test regarding the tolerance of my incredibly cool neighbors who did not complain. So I am pretty sure they are going to like what I put out this year.
Sunday, October 13, 2013

I will try to rely on natural light during the walkthrough haunt for all of the outdoor scenes where possible, aside from accent lights for emphasis and effect. There is something about the shadowplay cause by ambient light that cannot be recreated with dragging out floodlights and spotlights. Besides, what the eye can't fully see (regarding detail on the props and actors), the mind automatically fills in and interprets... usually not for the mental calm of the viewer. My little friend pictured above is obviously no real threat in full sunlight or fully illuminated by lamp. But in moonlight, I expect even he will get a few reactions. The vines that are not seen here, but are nearby, have a tendency to reach out and try to grab you when you walk past them in the moonlight. It would be a pity to lose that by flooding the area with electric lights.
Back into the evil clown room again. The "flesh" has been added to the ceiling hooks and the lighting placement is working well so far. To ensure the best possible showing, I try to leave the room often to return later for a different perspective. This has allowed me to move a few small elements around to get a better balance and has also made me realize that one particular prop may be the death of me. Or at the very least, I may injure my hand sometime soon by reaction-punching this thing, as it consistently causes me to flinch every time I pass it. And most of the time I remember that it is there. It is just that the placement, shadows, and form of the prop is as close to perfect as I think I could make it... considering it is a mask and a cloak and not much more. If anything I have causes a guest to go fetal or run straight into the nearby wall, this is the one. So I will not show it here. If you want to see it, you will need to visit on October 30th or 31st after sunset.
HOWEVER, I will gladly show you Goonie the Clown sitting under a spinning DJ light. His favorite show will be playing on a nearby TV. He looks like he might stand up at any moment. And on haunt night, he just might do that.

HOWEVER, I will gladly show you Goonie the Clown sitting under a spinning DJ light. His favorite show will be playing on a nearby TV. He looks like he might stand up at any moment. And on haunt night, he just might do that.

Friday, October 11, 2013


Every demonic hag needs a copy of the Necronomicon. There really is no good alternative when conjuring demons and having any hope of controlling them. So here is mine... or hers. Admittedly it is a bit too glossy in the final pic, but I am thinking it will show better at night.
Step 1) Locate unwanted book and slather on liquid latex in the form of a Necronomicon face. There are many out there, so no need to try to be exact. I use a cheap silicone spatula since it allows for a bit of a sculpting effect rather than brushing, and the later dried latex easily peels off. If possible, push in bits of previously dried scraps into the drying face to add a nasty textural element.
Step 2) Paint on a diluted calligraphy ink to both tint the latex and have the ink pool in the recesses, giving good definition and gloss. I used reds, a brown, and a black.
Step 3) Touch up with acrylic paint where needed and apply further diluted ink to get more warm tinting.


The finished product has a definite flesh texture, where it is pliable but otherwise firm. The sheen from the inks makes the book appear to still be wet, as if recently made. The bits that were added in have cause at least one tester to shiver and pull their hand away. Not bad for roughly $1 in material costs (assuming you have the inks and paints already).
Wednesday, October 2, 2013
I am too happy with one of the lights I ordered for my garage haunt, the last part of the yardhaunt walkthrough. I took a chance on some things from Amazon that received mixed reviews. If this light is still working after Halloween, I will have no regrets about this purchase. I think it had cost around $13 after shipping... from China (arriving before the domestically shipped stuff somehow). LED too. Plugs into a regular bulb outlet and has a motorized spinning dome to create the effect.
Tuesday, October 1, 2013

Monday, September 30, 2013


Tuesday, September 24, 2013

I will try to minimize any spoilers. 1) Front entrance tent. 2) Real entrance to the sideyard. 3) First scene, mostly enclosed. 4) Second scene, gory. 5) Dark creep, heavy vegetation. 6) Somewhat open yard under the tree canopy, with 1st possible exit if anyone wants to quit. 7) Attached workshed, the entrance to the garage haunt. 8) Garage haunt, with final exit near where the vehicle is pictured. Both exits dump guests into a large access alley to return to the front yard.
POI: A) TOT area, kid friendly. B) Not my pool, behind a 12 foot rockwall. C) Cool neighbor that doesn't mind my having a haunt. D) My 73 Buick... to be parked in the front under the tree. E) The access alley. G1) Main graveyard, family friendly. G2) Pet cemetery. G3) Creepy graveyard within the haunt.
Monday, September 23, 2013

Thursday, September 19, 2013


Monday, September 16, 2013


Friday, September 13, 2013

Thursday, September 5, 2013
My first headstone from Hauntcon 2013. Sidenote: the Hot Wire Foam Factory package has been ordered today, so the front yard graveyard props should be in full production mode by late next week. The handful I began using razor cutters and exacto knives came out decent, but lack good definition and take forever to do. So the wire router, sculptor, and hot knife will come in handy. Am still unsure what I will use the 3D scroll table for...but I am sure something will come to mind. In the meantime, marvel at my first foray into gravestones... the one I made under the direction of the people from Davis Graveyard. http://davisgraveyard.com/
 Disclaimer: My new ones will likely be more elaborate... but I had only an exacto for this one at the time.


Subscribe to:
Posts (Atom)